Deploying an Auto-Scaling VM Scale Set with a Custom Disk Image
Deploying a VM Scale Set via the Azure portal is straightforward when you are just using a clean, vanilla Windows OS image from the list that Azure provides you. However, what if a scale set that consists of a bunch of vanilla servers doesn’t help? What if I need to host a website on an infrastructure that scales up and down to meet demand?
I spent Sunday morning working on this exact problem.
If I need to deploy a group of IIS virtual machines that not only run the same web app but also scale up and down as demand changes, I am going to want to deploy an auto-scaling Virtual Machine Scale Set (VMSS) that is based on a custom disk image that contains my OS and fully configured web app. Otherwise, how are the additional instances that are automatically spun up going to run my web app?
The process was a bit more challenging than I expected. However, I was able to pull it off with some work.
To accomplish my goal, I had to complete the following tasks:
- Deploy a VM on Managed Disk
- Install IIS on my VM and Configure the Web App
- SysPrep the VM
- Shutdown and Stop the VM
- Capture the VM Disk Image
- Note the Location of the Image
- Build a Scale Set Template (actually borrowed one)
- Add Autoscale Settings to the Scale Set Template
- Ensure the Scale Set Template References the Captured Disk Image as the OS Disk
- Deploy the Scale Set Template
As you can see, there were actually quite a few steps involved to get this right. Unfortunately, it is what it is – you cannot use the Azure Portal alone to deploy an auto-scaling VM Scale Set that’s built on a custom disk image.
The Gold Image
Since I wanted all instances in my scale set to have the same identical configuration, including the web app settings and config, it only made sense that I would start by deploying a virtual machine in Azure, installing IIS on it, and then configuring my web app on it. With that in mind, I deployed a D1_v2 virtual machine with managed disk, installed IIS, and configured my web app.
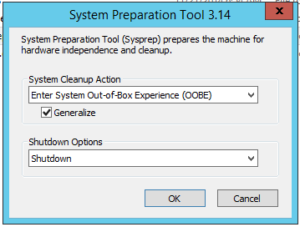 Once I confirmed that my web app was working, I ran SysPrep on the VM, chose OOBE with the “Generalize” option, and told SysPrep to shut the machine down when it was done.
After a few minutes, the machine was SysPrepped and shutdown so went into the Azure portal and stopped it to completely deallocate it.
I then needed to capture an image of my VM’s disk so I could use it as a reference for my scale set instances. To capture an image, I waited for my VM to be completely deallocated in my portal and then simply clicked the “Capture” button in Azure.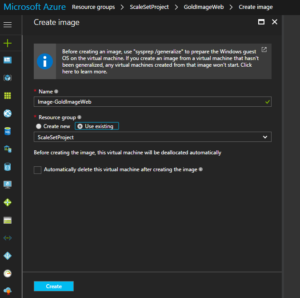
I waited for the capture to complete (about 3 minutes). My captured image would be the “Gold Image” that my scale set instances would use. Once the capture completed, I looked at the properties of the new disk image resource in my portal so I could note the location of the image.
The value under RESOURCE ID is the location of the image that I was interested in so I copied and pasted to a text file for future reference.
With the disk image location on hand; I was able to use an ARM template to deploy my scale set while specifying my custom disk image.
Creating the Scale Set Template
Although I was a coder at one time and know my way around ARM templates a bit, I will be the first to admit that I am not an ARM template expert. Lucky for me, there are scale set ARM templates published all over the internet. All I had to do was pull one down and modify it for my needs.
After pulling down this scale set ARM template, I went ahead and made a few minor modifications:
- Added custom disk reference (see orange code below)
- Added autoscale code (see red code below)
- Changed name reference (just some template cleanup)
- Changed instance values (see blue code below)
The complete template, including the autoscale settings is below:
 {
    "$schema": "http://schema.management.azure.com/schemas/2015-01-01-preview/deploymentTemplate.json",
    "contentVersion": "1.0.0.0",
    "parameters": {
        "vmSku": {
            "defaultValue": "Standard_DS1_V2",
            "type": "String",
            "metadata": {
                "description": "Size of VMs in the VM Scale Set."
            }
        },
        "vmssName": {
            "type": "string",
            "metadata": {
                "description": "Name of the VM scale set."
            }
      },
        "instanceCount": {
            "maxValue": 3,
            "type": "Int",
            "metadata": {
                "description": "Number of VM instances (100 or less)."
            }
        },
        "adminUsername": {
            "type": "String",
            "metadata": {
                "description": "Admin username on all VMs."
            }
        },
        "adminPassword": {
            "type": "SecureString",
            "metadata": {
                "description": "Admin password on all VMs."
            }
        },
        "osType": {
            "allowedValues": [
                "Windows",
                "Linux"
            ],
            "type": "String"
        }
    },
    "variables": {
        "namingInfix": "[toLower(substring(concat(parameters('vmssName'), uniqueString(resourceGroup().id)), 0, 9))]",
        "longNamingInfix": "[toLower(parameters('vmssName'))]",
        "vhdContainerName": "[concat(variables('namingInfix'), 'vhd')]",
        "addressPrefix": "10.0.0.0/16",
        "subnetPrefix": "10.0.0.0/24",
        "virtualNetworkName": "[concat(variables('namingInfix'), 'vnet')]",
        "publicIPAddressName": "[concat(variables('namingInfix'), 'pip')]",
        "subnetName": "[concat(variables('namingInfix'), 'subnet')]",
        "loadBalancerName": "[concat(variables('namingInfix'), 'lb')]",
        "publicIPAddressID": "[resourceId('Microsoft.Network/publicIPAddresses',variables('publicIPAddressName'))]",
        "lbID": "[resourceId('Microsoft.Network/loadBalancers',variables('loadBalancerName'))]",
        "natPoolName": "[concat(variables('namingInfix'), 'natpool')]",
        "bePoolName": "[concat(variables('namingInfix'), 'bepool')]",
        "natStartPort": 50000,
        "natEndPort": 50119,
        "natBackendPort": 22,
        "nicName": "[concat(variables('namingInfix'), 'nic')]",
        "ipConfigName": "[concat(variables('namingInfix'), 'ipconfig')]",
        "frontEndIPConfigID": "[concat(variables('lbID'),'/frontendIPConfigurations/loadBalancerFrontEnd')]",
        "computeApiVersion": "2016-04-30-preview",
        "networkApiVersion": "2016-03-30",
      "insightsApiVersion": "2015-04-01",
      "location": "[resourceGroup().location]"
    },
    "resources": [
        {
            "type": "Microsoft.Network/virtualNetworks",
            "name": "[variables('virtualNetworkName')]",
            "apiVersion": "[variables('networkApiVersion')]",
            "location": "[resourceGroup().location]",
            "properties": {
                "addressSpace": {
                    "addressPrefixes": [
                        "[variables('addressPrefix')]"
                    ]
                },
                "subnets": [
                    {
                        "name": "[variables('subnetName')]",
                        "properties": {
                            "addressPrefix": "[variables('subnetPrefix')]"
                        }
                    }
                ]
            }
        },
        {
            "type": "Microsoft.Network/publicIPAddresses",
            "name": "[variables('publicIPAddressName')]",
            "apiVersion": "[variables('networkApiVersion')]",
            "location": "[resourceGroup().location]",
            "properties": {
                "publicIPAllocationMethod": "Dynamic",
                "dnsSettings": {
                    "domainNameLabel": "[variables('longNamingInfix')]"
                }
            }
        },
        {
            "type": "Microsoft.Network/loadBalancers",
            "name": "[variables('loadBalancerName')]",
            "apiVersion": "[variables('networkApiVersion')]",
            "location": "[resourceGroup().location]",
            "properties": {
                "frontendIPConfigurations": [
                    {
                        "name": "LoadBalancerFrontEnd",
                        "properties": {
                            "publicIPAddress": {
                                "id": "[variables('publicIPAddressID')]"
                            }
                        }
                    }
                ],
                "backendAddressPools": [
                    {
                        "name": "[variables('bePoolName')]"
                    }
                ],
                "inboundNatPools": [
                    {
                        "name": "[variables('natPoolName')]",
                        "properties": {
                            "frontendIPConfiguration": {
                                "id": "[variables('frontEndIPConfigID')]"
                            },
                            "protocol": "tcp",
                            "frontendPortRangeStart": "[variables('natStartPort')]",
                            "frontendPortRangeEnd": "[variables('natEndPort')]",
                            "backendPort": "[variables('natBackendPort')]"
                        }
                    }
                ]
            },
            "dependsOn": [
                "[concat('Microsoft.Network/publicIPAddresses/', variables('publicIPAddressName'))]"
            ]
        },
        {
            "type": "Microsoft.Compute/virtualMachineScaleSets",
            "sku": {
                "name": "[parameters('vmSku')]",
                "tier": "Standard",
                "capacity": "[parameters('instanceCount')]"
            },
            "name": "[parameters('vmssName')]",
            "apiVersion": "[variables('computeApiVersion')]",
            "location": "[resourceGroup().location]",
            "properties": {
                "overprovision": "true",
                "upgradePolicy": {
                    "mode": "Manual"
                },
                "virtualMachineProfile": {
                    "storageProfile": {
                        "imageReference": {
                            "id": "/subscriptions/9cbf5438-a4a1-4227-8a0d-18e92fe2e472/resourceGroups/vmssdemo/providers/Microsoft.Compute/images/GoldImage"
                        }
                    },
                    "osProfile": {
                        "computerNamePrefix": "[variables('namingInfix')]",
                        "adminUsername": "[parameters('adminUsername')]",
                        "adminPassword": "[parameters('adminPassword')]"
                    },
                    "networkProfile": {
                        "networkInterfaceConfigurations": [
                            {
                                "name": "[variables('nicName')]",
                                "properties": {
                                    "primary": "true",
                                    "ipConfigurations": [
                                        {
                                            "name": "[variables('ipConfigName')]",
                                            "properties": {
                                                "subnet": {
                                                    "id": "[concat('/subscriptions/', subscription().subscriptionId,'/resourceGroups/', resourceGroup().name, '/providers/Microsoft.Network/virtualNetworks/', variables('virtualNetworkName'), '/subnets/', variables('subnetName'))]"
                                                },
                                                "loadBalancerBackendAddressPools": [
                                                    {
                                                        "id": "[concat('/subscriptions/', subscription().subscriptionId,'/resourceGroups/', resourceGroup().name, '/providers/Microsoft.Network/loadBalancers/', variables('loadBalancerName'), '/backendAddressPools/', variables('bePoolName'))]"
                                                    }
                                                ],
                                                "loadBalancerInboundNatPools": [
                                                    {
                                                        "id": "[concat('/subscriptions/', subscription().subscriptionId,'/resourceGroups/', resourceGroup().name, '/providers/Microsoft.Network/loadBalancers/', variables('loadBalancerName'), '/inboundNatPools/', variables('natPoolName'))]"
                                                    }
                                                ]
                                            }
                                        }
                                    ]
                                }
                            }
                        ]
                    }
                }
            },
            "dependsOn": [
                "[concat('Microsoft.Network/loadBalancers/', variables('loadBalancerName'))]",
                "[concat('Microsoft.Network/virtualNetworks/', variables('virtualNetworkName'))]"
            ]
        },
{
  "type": "Microsoft.Insights/autoscaleSettings",
      "apiVersion": "[variables('insightsApiVersion')]",
      "name": "autoscalehosts",
      "location": "[variables('location')]",
      "dependsOn": [
        "[concat('Microsoft.Compute/virtualMachineScaleSets/', parameters('vmssName'))]"
      ],
  "properties": {
    "enabled": true,
    "name": "autoscalehosts",
    "profiles": [
      {
        "name": "Profile1",
        "capacity": {
          "minimum": "1",
          "maximum": "3",
          "default": "1"
        },
        "rules": [
          {
            "metricTrigger": {
              "metricName": "Percentage CPU",
                  "metricNamespace": "",
                  "metricResourceUri": "[concat('/subscriptions/',subscription().subscriptionId, '/resourceGroups/',  resourceGroup().name, '/providers/Microsoft.Compute/virtualMachineScaleSets/', parameters('vmSSName'))]",
                  "timeGrain": "PT1M",
                  "statistic": "Average",
                  "timeWindow": "PT5M",
                  "timeAggregation": "Average",
                  "operator": "GreaterThan",
                  "threshold": 60.0
            },
            "scaleAction": {
              "direction": "Increase",
                  "type": "ChangeCount",
                  "value": "1",
                  "cooldown": "PT1M"
            }
          },
          {
            "metricTrigger": {
               "metricName": "Percentage CPU",
                  "metricNamespace": "",
                  "metricResourceUri": "[concat('/subscriptions/',subscription().subscriptionId, '/resourceGroups/',  resourceGroup().name, '/providers/Microsoft.Compute/virtualMachineScaleSets/', parameters('vmSSName'))]",
                  "timeGrain": "PT1M",
                  "statistic": "Average",
                  "timeWindow": "PT5M",
                  "timeAggregation": "Average",
                  "operator": "LessThan",
                  "threshold": 30.0
            },
            "scaleAction": {
              "direction": "Decrease",
                  "type": "ChangeCount",
                  "value": "1",
                  "cooldown": "PT1M"
            }
          }
        ]
      }
    ],
    "targetResourceUri": "[concat('/subscriptions/', subscription().subscriptionId, '/resourceGroups/', resourceGroup().name, '/providers/Microsoft.Compute/virtualMachineScaleSets/', parameters('vmSSName'))]"
  }
}
    ]
}
An in-depth explanation of the architecture of this template file will require an entire post all by itself so I am not going to break down the template here. That said, keep an eye out for a future post, where I will break everything down.
What Does the Template Do?
In its current state, the template (as written) limits the initial scale set deployment to a maximum of 3 instances. It also deploys the required load balancer for the scale set, along with the network and subnet values specified in the template (10.0.0.0/16 and 10.0.0.0/24).
The template configures the scale set to autoscale based on CPU utilization. At 60% utilization over 5 minutes, it will scale up by one instance. At 30% utilization, it will scale down by one instance.
Deploying the Template
Deploying the scale set using the template isn’t terribly difficult. To deploy it, browse the marketplace in the portal and search for “template deployment” and click on it in the list.
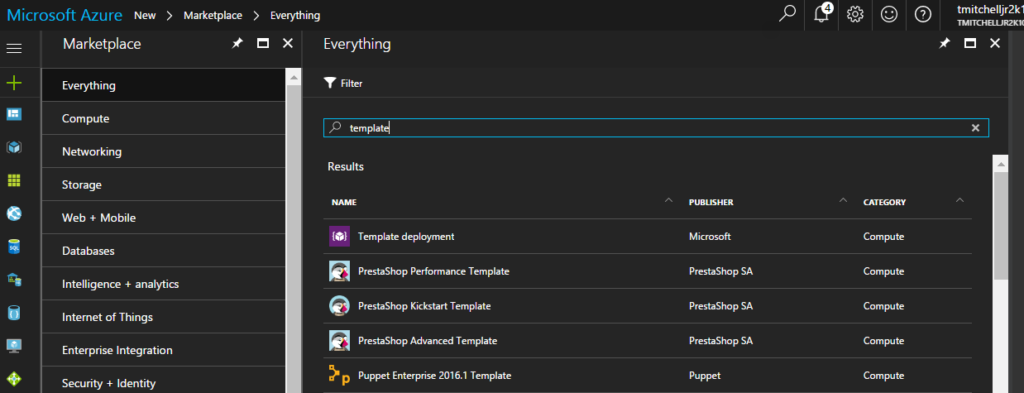
After clicking on the “Template Deployment” resource, click the blue “Create” button. You’ll then be offered the opportunity to upload the template.
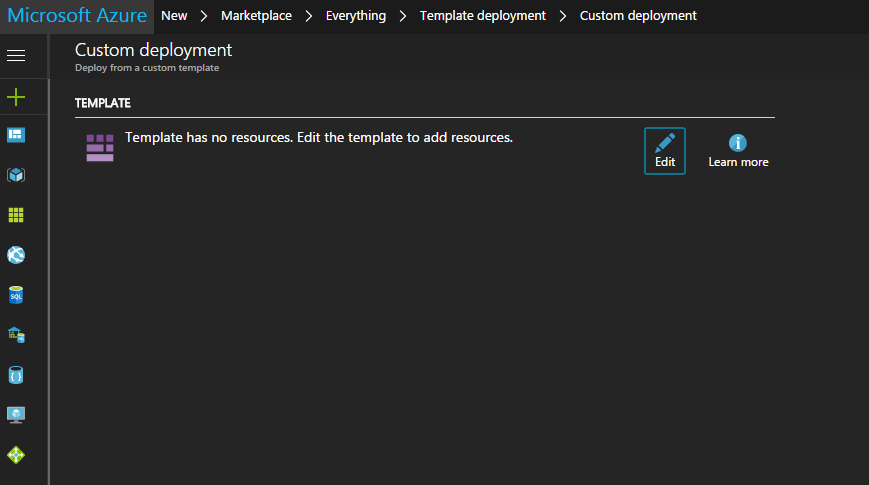
Click the “Edit” button, then “Load File”, and then browse to your saved template file. The screen will change, displaying the content of your template:
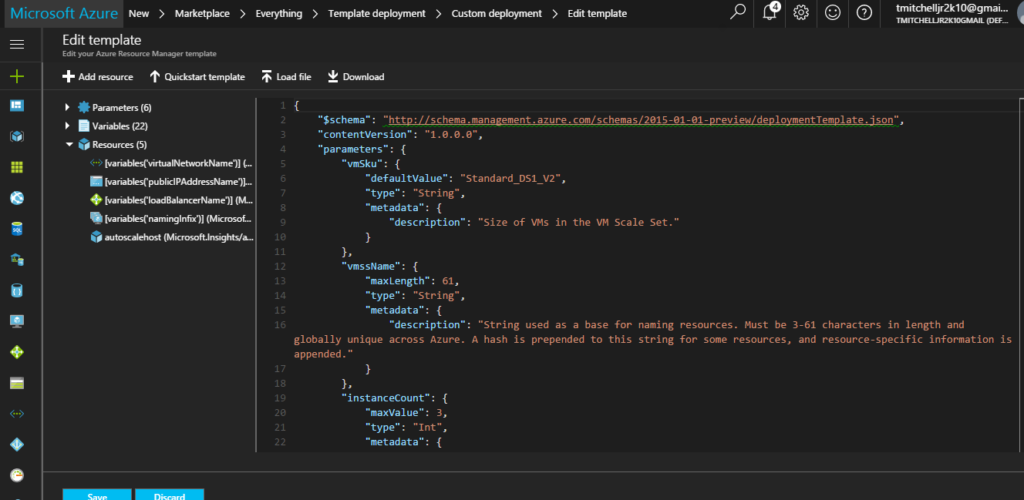
With your template loaded, click “Save”.
You will be prompted for information about your scale set. Provide the following information:
- Resource Group (I usually create a new one so everything is in one place)
- VMSS Name (name of your scale set)
- Instance Count (number of instances to deploy)
- Admin Username (admin username for all instances)
- Admin Password (admin password for all instances)
- OS Type (what type of OS you are deploying)
After supplying the information for your new scale set, check the box to agree to terms and conditions and then click “Purchase”. The template is validated and the deployment begins.
Deployment takes maybe 10-15 minutes or so.
When complete, you will have an auto-scaling VM Scale Set that is based on a managed custom disk image. All instances that are spun up will contain your applications and your OS just as they were configured on your “Gold Image”.
Your Turn…
So, now it’s your turn. If you want to deploy a scale set based on a custom disk image, you will want to deploy a virtual machine through the portal before you do anything else. I typically use the D1_V2 size. Once you have the virtual machine deployed and OS configured, install and configure your applications on the server. You will obviously have to RDP into it to do this.
After ensuring your applications work correctly, perform a SysPrep on the server by browsing to Windows\System32\Sysprep and running the sysprep.exe app. When running SysPrep, you should choose the OOBE option, ensure the “Generalize” box is checked, and select the option to shut down after SysPrep is done. When SysPrep is complete, the virtual machine will shut down. Before going onto the next step, go into your Azure portal and “Stop” the virtual machine from the Overview blade of your VM.
With the virtual machine stopped, click the “Capture” icon. After a few minutes, you will have a “disk image” resource in your resource group in Azure. To get the location of the image, click on the image resource and note the value in the RESOURCE ID value.
After noting the disk image location, copy the template code from earlier in this article and save it as “template.json”. Make sure you do not save it as a text file.
Once you have the file saved, go to the orange code in the file and replace it with the value from your RESOURCE ID box. With the disk image location modified, there are no other required changes to the template file. You can save your file and deploy it. Go back to the Deploying the Template section of this article for the steps involved in deployment.
How Do I Know It Worked?
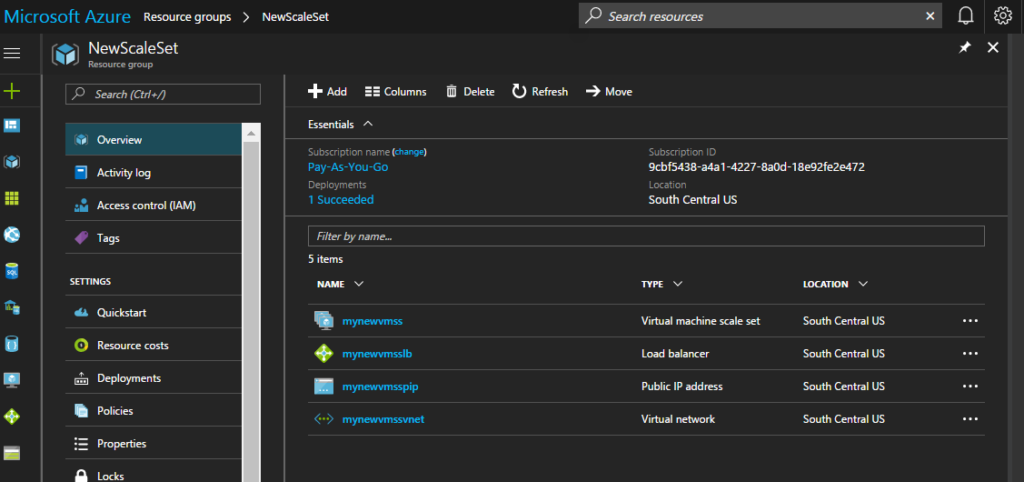
Browse to your Resource Group in your portal and click “Overview”. You should see the following resources running in the right pane:
- Virtual Machine Scale Set
- Load Balancer
- Public IP Address
- Virtual Network
The names of your resources will be based on what name you gave your Scale Set when you deployed it.
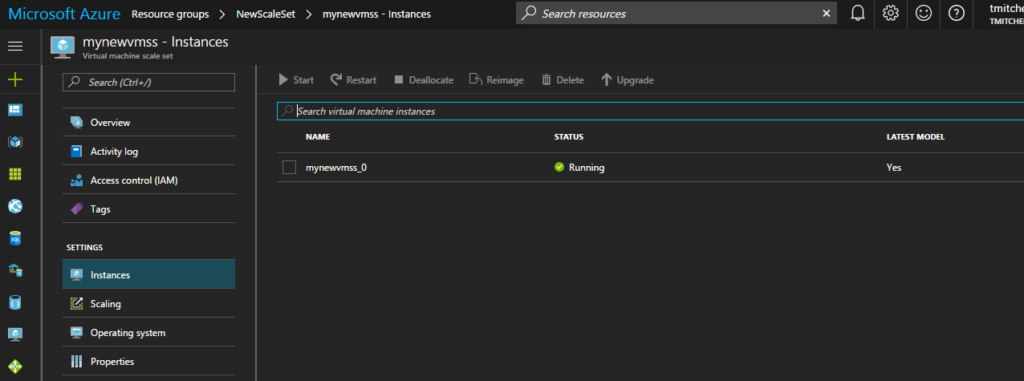
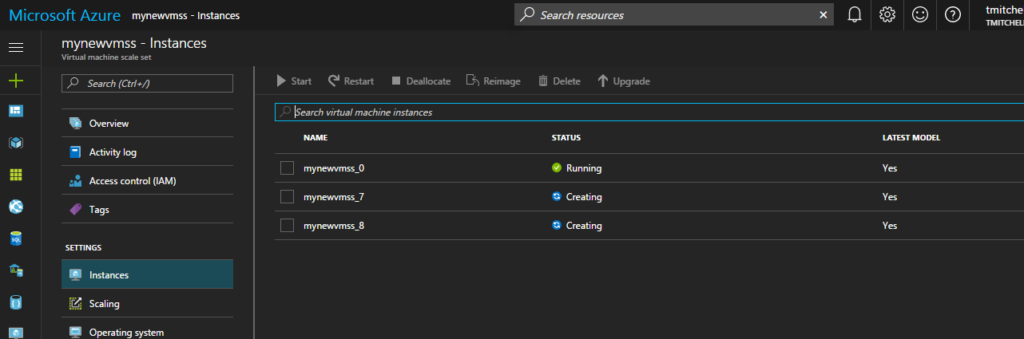
If you click on the scale set, and then “Instances” under “Settings”, you will see how many instances are running.
A cool test to run is to download LoadSim to your instance and jack up the CPU cycles. As the CPU utilization rises, you will see Azure automatically deploy additional instances as part of the scale set. You can download the LoadSim here.
But How to I Connect?
Did you notice that there is no “Connect” option that allows you to RDP into your instances? That is “as-designed” in order to reduce costs and complexity of the need for a public IP for every instance that is spun up. However, what you CAN do is spin up a “jump box” (another VM in Azure) and RDP to your instances from it.
The IP addresses for your instances can be found by clicking on the Load Balancer resource and then “Backend Pools”. Azure will display the instances on the backend, along with their private IP addresses.

Simply RDP to the IP address of the instance and install the load simulator. Mess around with the settings and watch as the scale set adds and removes instances based on load.
Wrap Up
If you ask me, the process of creating a scale set based on a custom image is a bit more tedious than it really needs to be. I suspect that, at some point, the functionality will be added to the portal. However, until then, we are left with PowerShell and ARM Templates as our options.
With that said, it never hurts to know your way around PowerShell and templates anyway so get to it. Go deploy your own autoscaling VM scale set using a template and add another skillset to your Azure arsenal!
Thomas Mitchell administrator
Who is Tom Mitchell and what does he know about IT? Tom is a 20+ year veteran if the IT industry. His broad skillset features expert-level knowledge of technologies such as Active Directory, Microsoft Exchange, Office 365, and Microsoft Azure. Tom's skillset also includes other diciplines such as VMWare, Storage, PKI, and more. Tom holds the coveted MCSE: Cloud Platform & Infrastructure certification, along with a few MCSA certifications and numerous other certifications - including the VMWare VCP certification. With extensive planning, design, implementation, and support experience, there is very little that Tom cannot handle.
About the author