CHAPTER 4: Deploying Windows 10 and Office 365 ProPlus
Welcome to Deploying Windows 10 and Office 365 ProPlus. In this chapter, we are going to cover the different ways that you can deploy Windows 10 and Office 365 ProPlus in your environment. We will start things off by covering the steps you need to take to plan for Windows 10 and Office 365 ProPlus deployments. We’ll cover hardware assessment and application compatibility assessment, along with network assessment and optimization.
Next, we’ll cover the different deployment options for Windows 10. We’ll look at things like Windows autopilot, in-place upgrades, and dynamic provisioning. We will also look at subscription activation as a means for switching from one edition of Windows 10 to another.
After covering the deployment options for Windows 10, will take a look at the different deployment options for Office 365 ProPlus. We will take a look at Configuration Manager, the office deployment tool, and manual installation from the Office 365 portal.
Once we finish working through the different Office 365 ProPlus deployment options, we’ll cover servicing channels and deployment rings.
Coming down the home stretch, we will cover updates for Office 365 ProPlus. We’ll take a look at the different update channels for Office 365 ProPlus including the Monthly Channel, the semiannual targeted channel, and the Semi-Annual Channel. In this lecture, you’ll learn how to choose the appropriate update channel for your organization and how updates are installed for Office 365 ProPlus.
Rounding things out, we’ll dive into licensing and activation in Office 365 ProPlus, where you’ll learn about licensing Office 365 ProPlus, reduced functionality mode, and how to activate Office 365 ProPlus. You’ll also learn how to manage activated installations.
Planning Deployments
When planning an enterprise deployment of Windows 10 and Office 365 ProPlus, you need to ensure that you properly assess your environments and your network. You also need to make sure that any existing hardware and applications in your environment will work with your new software.
Assessing Compatibility
Although virtually all applications that have been written in the last decade will run on Windows 10 - and virtually all add-ins and VBA macros that are based on previous versions of Office will work in the latest versions of Office - your organization should ensure that existing applications and hardware will support Windows 10 and Office 365 ProPlus before rolling them out.
To help with this process, Microsoft offers several different tools.
The Windows Analytics Upgrade Readiness Tool is provided to assess desktop, device, and application readiness. This tool provides information about application and driver compatibility, and it provides a detailed assessment of any identified issues that could prevent an upgrade. It also provides links to suggested fixes for any issues it identifies.
The Readiness Toolkit for Office Add-Ins and VBA is designed to help organizations identify compatibility issues with existing Microsoft VBA macros and add-ins. This tool scans for VBA macros in Word, Excel, PowerPoint, Access, Outlook, Project, Visio, and Publisher files.
Desktop App Assure is a new service that you can use to address issues with Windows 10 and Office 365 ProPlus application compatibility. This service comes with the Fast-Track Center Benefit for Windows 10. To get access to the Fast-Track Center Benefit for Windows 10, you must have an eligible subscription. An eligible subscription is one that includes at least 150 licenses for an eligible service or plan for your Office 365 tenant.
Before deploying Windows 10 and Office 365 ProPlus in production, Microsoft recommends that you first deploy them to a pilot group of users on a pilot group of devices across the organization. By testing your deployment with a pilot group first, you can mitigate any issues that crop up before you deploy into production.
Network Assessment and Optimization
Before deploying and managing updates for Windows 10 and Office 365 ProPlus, you need to ensure you have the necessary bandwidth to do so. The Office 365 ProPlus installation files are at least 1.6 GB in size – and this is just for the core files. Each language that you deploy will add another 250 MB.
To help deal with network bandwidth limitations, there are several built-in methods for automatically limiting bandwidth. Express Update Delivery and Binary Delta Compression both help reduce the size of your update downloads. These methods ensure that you only download the changes that have occurred between the current update and the previous update. This typically vastly minimizes the impact to your network.
There also peer-to-peer options available. These options essentially shift Windows 10 and Office 365 ProPlus traffic away from the center of your network. What this does is reduce the need for throttling. Using a peer-to-peer option allows computers to find necessary update files on other machines in the local network, instead of downloading those files from a central distribution share on the network or from the internet.
There are currently three peer-to-peer options available. These options include Branch Cache, Peer Cache, and Delivery Optimization.
Branch Cache allows you to download source files in a distributed environment without crushing your network. What Branch Cache does is retrieve the content from the main office or from hosted cloud content servers. It then caches that content at your branch office locations. Users from these locations can then access that content locally instead of accessing it over the WAN.
Peer Cache comes with Configuration Manager. It allows clients to share source files directly from other clients. Organizations will often use Peer Cache to manage the deployment of source files to users in remote locations. You can use Branch Cache and Peer Cache together in the same environment.
With Delivery Optimization, your clients can download source files from alternate sources, including other peers on the local network. This is in addition to Windows Update Servers. Delivery Optimization can be used with Windows Update, Windows Server Update Services (WSUS), Windows Update for Business, and Configuration Manager.
By assessing hardware and application compatibility, and assessing and optimizing your network, you can ensure a smooth deployment of Windows 10 and Office 365 ProPlus.
Windows 10 Deployment Options
There are actually quite a few ways to deploy Windows 10 in an organization. You can use existing tools such as InTune, Azure AD, and Configuration Manager OR you can you one of several new deployment tools and methods that are now available. These new tools and methods include Windows Autopilot, In-Place Upgrades, Dynamic Provisioning, and Subscription Activation.
With Windows Autopilot, you can customize the out of box experience (OOBE) so that you can deploy applications and settings that are preconfigured specifically for your organization. This allows you to include just the applications that your users need. Windows Autopilot is probably the easiest way to deploy new PCs that run Windows 10. It can also be used in conjunction with Configuration Manager to upgrade Windows 7 and Windows 8.1 machines to Windows 10.
Leveraging In-Place Upgrades allow you to upgrade to Windows 10 without reinstalling the OS. This method allows you to migrate applications, user data, and settings from one version of Windows to another. You can also use an in-place upgrade to update a Windows 10 machine from one release to the next.
Dynamic Provisioning allows you to create a package that you can use to quickly configure multiple devices, even those that have no network connectivity. Using Windows Configuration Designer, you can create provisioning packages and install them over the network, or even from a USB drive. They can also be installed in NFC tags or barcodes.
Using Subscription Activation, you can use subscriptions to switch from one edition of Windows 10 to another. An example of this would be a scenario where you need to switch a user from Windows 10 Pro to Windows 10 Enterprise. In this scenario, if a licensed user signs into the Windows 10 device, assuming the user has a Windows 10 E3 or E5 license, the operating system automatically changes from Windows 10 Pro to Windows 10 Enterprise. This unlocks the Windows 10 Enterprise features. I should mention that if the associated E3 or E5 license expires, the Windows 10 device simply reverts back to the Windows 10 Pro addition. You are, however, offered a grace period of up to 90 days before it reverts back.
So, as you can see there are several ways to deploy Windows 10.
Deployment Options for Office 365 ProPlus
There are several ways to deploy Office 365 ProPlus. Let’s take a look at the options that are available.
You can use Configuration Manager, the Office Deployment Tool, and Microsoft InTune to perform Office 365 ProPlus deployments. You can, of course, also install directly from the Office 365 portal.
Configuration Manager is a good choice for enterprises that already leverage a solution to deploy and manage their existing software. The Office Deployment Tool is a good choice for organizations who need to manage their Office 365 ProPlus deployment, but do not have Configuration Manager deployed. Organizations that wish to deploy and manage Office 365 ProPlus directly from the cloud should consider Microsoft InTune. However, the easiest approach to deploying Office 365 ProPlus is to just allow your users to install it directly from the Office 365 Portal. The caveat to this solution, though, is that it provides far less control over the deployment process.
When you deploy Office 365 ProPlus using the Office Deployment Tool or through Configuration Manager, you’ll typically create configuration files using the Office Customization Tool. These configuration files are then used to define the configuration of Office. This process provides you with more control over your installations. There are also similar options available when you use InTune to deploy Office 365 ProPlus.
I should mention here, that depending on how you decide to deploy Office 365 ProPlus, you can choose to deploy directly from the cloud or you can download Office to local storage on your network, where you can then deploy from. Microsoft, however, recommends that you deploy Office directly from the cloud because it minimizes administrative overhead. When deployed in this fashion, Office 365 ProPlus is installed on your client devices right from the Office Content Delivery Network. If you find that your internet bandwidth can’t support installations directly from the cloud, you can use Configuration Manager to manage your deployments and updates that can be pulled from a local network location.
The deployment option you choose will be largely dependent on your network infrastructure, your user base, and your corporate policies.
Windows-as-a-Service
Under the Windows-as-a-Service model, Microsoft has simplified the OS build and deployment process. Instead of providing major OS revisions every few years, with service packs released between those revisions, Windows updates are now treated more like ongoing maintenance tasks. This means that Windows will now receive updates and revisions on a more frequent basis. These updates and revisions are also applied with less disruption.
These new updates fall into two different buckets. These buckets include Feature Updates and Quality Updates. Feature Updates are updates that add new functionality. They are released twice a year and can be deployed using existing management tools. Feature Updates are typically smaller because they are more frequent. Because they are smaller, the impact to organizations when deploying them is reduced.
Quality Updates are security updates and fixes. These updates are typically issued once a month. More specifically, the second Tuesday of each month, otherwise known as Patch Tuesday. When a cumulative update is released on Patch Tuesday, it includes all previous updates. This makes it easier to ensure that devices are fully up to date.
You can use deployment rings and servicing channels to control how updates are applied - and when.
Servicing Channels
There are three servicing channels offered by Windows-as-a-Service. Each channel receives new feature updates on a different schedule. These channels include the Semi-Annual Channel, the Long-Term Servicing Channel, and Windows Insider. The purpose of these servicing channels is to provide organizations with a way to control the frequency at which they deploy Windows 10 features.
Deployment Rings
Deployment rings are similar to machine groups that you may have used previously to manage updates for earlier versions of Windows in WSUS. There used to gradually deploy Windows 10. You can use deployment rings to group devices together and to ensure those devices receive their updates through the same servicing channels.
You can use the same management tools to deploy servicing channel updates that you used in earlier versions of Windows. For example, you can use the Windows Insider program to allow users to familiarize themselves with Windows features before they are released to the larger population of users within the organization. This allows organizations to get a look at early builds and to test them before they are released to the general public.
You can use the Semi-Annual Channel to receive updates as soon as Microsoft publishes them. Feature updates go out to the Semi-Annual Channel Once in the spring and once in the fall.
You can also use the Long-Term Servicing Channel to deploy updates to your organization. The Long-Term Servicing Channel is for computers and other devices that essentially perform a single task or several specialized tasks. For these types of computers and devices, the Long-Term Servicing Channel prevents them from receiving feature updates. However, quality updates are not affected. I should point out that the Long-Term Servicing Channel is only available in the Windows 10 Enterprise LTSC edition. Feature updates are released to LTSC about once every three years.
A typical deployment ring strategy might consist of four rings. For example, the first ring may be a preview ring that leverages the Windows Insider Program. This ring would be reserved for a small group of devices that you wish to use for testing. The next ring would be the targeted ring, which leverages the Targeted Semi-Annual Channel. You would use this ring to evaluate important updates before you deploy them to other devices in your environment. The next ring would be the production ring. This ring would leverage the Semi-Annual Channel and would be used to deploy updates to production machines. A fourth ring might be a critical ring. This critical ring would leverage the Semi-Annual Channel as well, but it would be reserved for machines that are critical, and which are only updated after thorough testing throughout the rest of your organization.
Ring strategies like the one in this example allow organizations to control how updates are deployed to all of their devices.
Windows-as-a-Service, when leveraged properly, is essentially an ongoing process that you use to handle Windows updates in an organization. The servicing models that are available for managing Windows-as-a-Service updates include Windows Update (or standalone), Windows Update for Business, WSUS, and System Center Configuration Manager (SCCM).
Windows Update offers limited control over feature updates. Devices are typically manually configured to use the Semi-Annual Channel. An organization that uses Windows Update can specify when updates get installed and to what devices. I should also mention that the updates do not even have to come from an on-prem server.
Windows Update for Business provides control over update deferments while also allowing for centralized management through group policy. You can use Windows Update for Business to defer updates for up to a year. Devices that are updated using Windows Update for Business need to be updated periodically and monitored using one system.
Windows Server Update Services, or WSUS, allows for significant control over Windows updates. This tool, which is native to the Windows Server OS, allows organizations to not only defer updates, but to also add an approval layer for updates that allows organizations to specify groups of computers that should receive updates.
System Center Configuration Manager offers the most control and is the most cost-effective option to service Windows-as-a-Service. Updates can be deferred and approved by IT staff, and there are also multiple options for targeting and bandwidth management. System Center Configuration Manager allows for consistent scheduling of updates across all devices within the enterprise. I should point out, however, that application deployments and operating system updates must originate from an on-prem server when using system Center Configuration Manager.
So which servicing option, should you choose? Well, the servicing option that you choose will be largely governed by the resources you have available to you, your IT staff, and the knowledge of that IT staff. If you already use. System Center Configuration Manager to manage your Windows updates, it probably makes sense to continue using it. However, if you are already using a solution like WSUS, it probably makes sense to continue using WSUS. Your environment and your staff will ultimately determine which solution is right for you.
Office 365 ProPlus Updates
There are several types of updates that are available for Office 365 ProPlus. Let’s take a look at these types of updates and figured out how to choose the appropriate update channel for your organization.
Because Microsoft provides new features for Office 365 applications pretty regularly, it’s important that you keep it updated. Microsoft offers multiple update channels that you can use to keep Office 365 ProPlus updated. These channels are used to control how often Office 365 ProPlus receives feature updates.
The three primary update channels that are available for Office 365 ProPlus include the Monthly Channel, the Targeted Semi-Annual Channel, and the Semi-Annual Channel. The Monthly Channel, as you would expect, receives feature updates roughly every month. The Targeted Semi-Annual Channel receives feature updates in March and in September. Organizations will often use this channel for its pilot users and for application compatibility testing. The Semi-Annual Channel receives feature updates twice a year, once in January and again in July.
The feature updates that are released in the Semi-Annual Channel will generally have already been released through the Monthly Channel in prior months. I should note that the Semi-Annual Channel is the default update channel for Office 365 ProPlus.
Microsoft also provides additional updates for each channel as needed. These include Security Updates and Quality Updates. While Security Updates are often released on patch Tuesday, which is the second Tuesday of every month, they can be released at other times when needed. Quality Updates are non-security updates which are also released on patch Tuesday.
Choosing the Right Update Channel
Organizations obviously have different needs - and these needs will determine which update channels are needed. For example, an organization might leverage the Semi-Annual Channel if it uses business applications, add-ins, and macros that must be tested to ensure they work with an updated version of Office 365 ProPlus.
However, an organization that wants its users to have access to the latest Office 365 ProPlus features as soon as they become available might want to leverage the Monthly Channel, assuming there is no need for any kind of application compatibility testing.
It’s important to note that an organization can leverage different update channels for different users. Not all users need to be on the same channel.
Installing Updates for Office 365 ProPlus
When an Office 365 ProPlus update occurs, all updates for the specific channel are installed at the same time. For example, you won’t get a separate download for Security Updates, a separate download for Quality Updates, etc. They are all installed at the same time. I should also mention that updates are cumulative. This means that the latest update will include all previously released feature, security, and quality updates for the specific channel.
Office 365 ProPlus goes out and checks for updates on a regular basis. These updates are then downloaded and installed automatically. Although users can continue using their office applications while uploads are being downloaded, once the actual update installation begins, those users will be prompted to save their work and to close their apps to allow the installation of the downloaded updates.
Office 365 Licensing and Activation
Before you can deploy Office 365 ProPlus to your users, you first need to assign licenses to them. Once you’ve assigned licenses to your users, they can begin installing the software. Once licensed, each user can install Office 365 ProPlus on up to five different computers or devices. Because each installation is activated and kept activated automatically, you don’t even have to keep track of product keys. You also don’t have to worry about dealing with KMS or MAK services. What you do have to do, however, is ensure that your users connect to the internet at least once every 30 days so their licenses can be kept activated by the Office licensing service.
Licensing Office 365
Assigning an Office 365 ProPlus license to a user is as simple as checking a box on the licensing page for the users account. Once you’ve assigned licenses to your users, they can install office right from the Office 365 portal. You can also deploy Office to your end users from a shared location on your local network. Users cannot install Office from the Office 365 portal until they have been assigned a license.
Reduced Functionality Mode
If you remove a user’s Office 365 ProPlus license, any existing installations of Office 365 ProPlus for that user will go into what is called Reduced Functionality Mode. Deactivating a user’s Office 365 ProPlus license for a specific device will also cause Office 365 ProPlus to go into Reduced Functionality Mode, but only on that device.
An Office 365 ProPlus installation that has gone into Reduced Functionality Mode will remain installed on the computer; however, the user will only be able to view and print documents. They will not be able to edit documents nor create new documents.
I should also point out that every time the unlicensed user runs Office 365 ProPlus, that user will be prompted to sign in and activate the software.
Activating Office 365 ProPlus
When Office 365 ProPlus is installed, it communicates back to the Office Licensing Service and the Activation and Validation Service. It does this so it can obtain and activate a product key. Whenever a user logs into his computer, the computer will connect to the Activation and Validation service. This is done in order to verify the license status of the software and to extend the product key.
Office will remain fully functional as long as the computer connects to the internet at least once every 30 days. Office will enter Reduced Functionality Mode if a computer goes off-line for more than 30 days. Once the computer connects back to the internet, the Activation and Validation Service will automatically reactivate the installation and it will become fully functional again.
Managing Activated Installations
As I mentioned previously, an Office 365 ProPlus license allows a user to install Office on up to five different computers. However, if that user tries to install Office 365 Pro on sixth computer, the user will first need to deactivate one of the existing five installations. This causes the installation that is deactivated to go into Reduced Functionality Mode.
What You’ve Learned
Congratulations! You’ve reached the end of Deploying Windows 10 and Office 365 ProPlus. Let’s review what you’ve learned.
Throughout this chapter, we covered the different ways that you can deploy Windows 10 and Office 365 ProPlus in your environment. We started things off by covering the steps you need to take to plan for Windows 10 and Office 365 ProPlus deployments. We covered hardware assessment and application compatibility assessment, along with network assessment and optimization.
Next, we covered the different deployment options for Windows 10. We looked at things like Windows Autopilot, In-Place Upgrades, and Dynamic Provisioning. We also looked at Subscription Activation as a means for switching from one edition of Windows 10 to another.
After covering the deployment options for Windows 10, we reviewed the different deployment options for Office 365 ProPlus. We looked at Configuration Manager, the Office Deployment Tool, and Manual Installation from the Office 365 portal.
Once we finished working through the different Office 365 ProPlus deployment options, we dove into the Windows-as-a-Service model, where we covered servicing channels and deployment rings.
Coming down the home stretch, you learned about updates for Office 365 ProPlus. You learned about the different update channels for Office 365 ProPlus including the Monthly Channel, the Semi-Annual Targeted Channel, and the Semi-Annual Channel. You also learned how to choose the appropriate update channel for your organization and how updates are installed for Office 365 ProPlus.
Rounding things out we dove into licensing and activation in Office 365 ProPlus, where you learned about licensing Office 365 ProPlus, Reduced Functionality Mode, and how to activate Office 365 ProPlus. You also learned how to manage activated installations.
At this point, you should have a good idea of what all goes into planning for and deploying Windows 10 and Office 365 ProPlus.
How to Deploy a Virtual Machine in Azure with PowerShell
Introduction
I’m a GUI guy. When offered the choice between using a GUI to perform a task and using PowerShell, I will almost always choose the GUI. However, that does not mean I won’t or can’t use PowerShell. In fact, any Microsoft engineer worth anything should be familiar with using PowerShell. As such, I’m going to explain to you in this article how to use PowerShell to configure and deploy several Azure resources, including a Resource Group, a Storage Account, a Virtual Network, a Subnet, a Public IP address, a Network Interface, and last, but not least, a Virtual Machine.
Install Azure PowerShell
Before doing anything in Azure with PowerShell, you are going to have to install Azure PowerShell. To do so, visit this link and click on Windows Install under the PowerShell section.
Connect to Azure with PowerShell
Once you’ve installed Azure PowerShell, go ahead and launch PowerShell from your workstation:
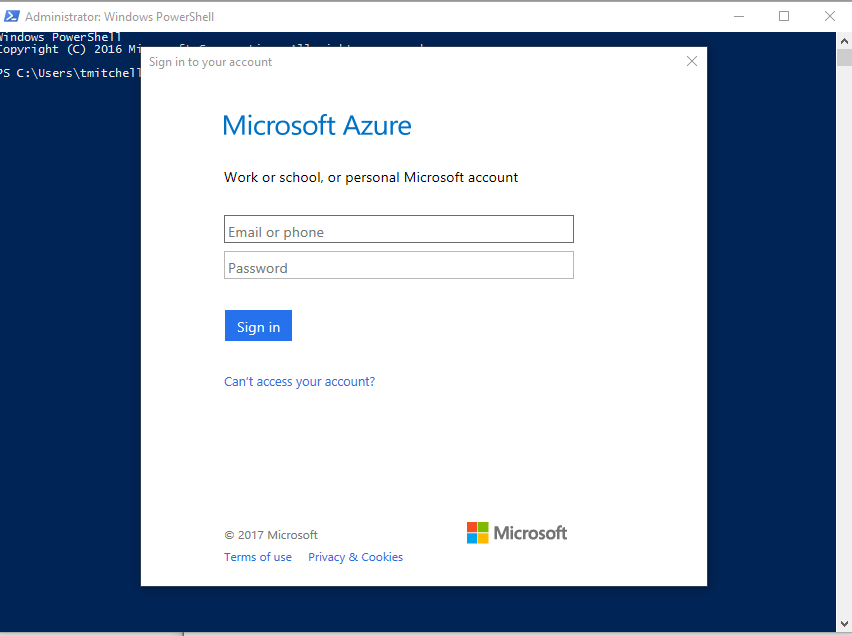
After launching PowerShell, go ahead, type Login-AzureRmAccount, and hit Enter. When prompted for your Azure credentials supply them and click Sign In.
Once you’ve signed in, it’s time to create your resource group, which will contain all of the resources you are about to create.
Create a resource group
Before you create your resource group, you need to decide where you are going to create it and what you are going to name it. To get a list of available locations where resources can be created, type the following command in PowerShell and hit Enter:
Get-AzureRmLocation | sort Location | Select Location
After hitting Enter, you will be provided with a number of Locations to choose from.
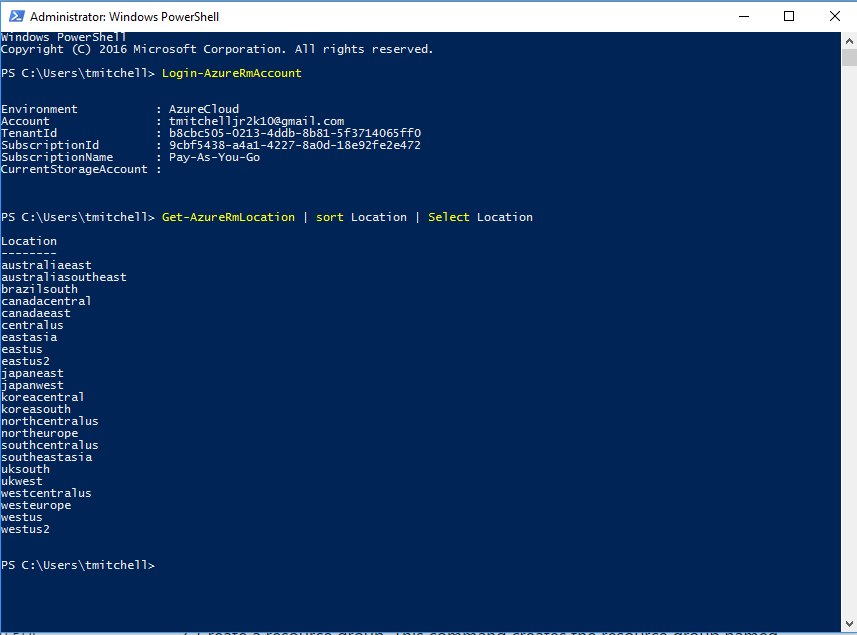
For this exercise, note the location westus as your chosen location and let’s call the resource group myAzureResourceGroup.
Now that you’ve settled on a location and name for your resource group, type the following three commands in PowerShell, hitting Enter after each one:
$location = "westus"
$myResourceGroup = "myAzureResourceGroup"
New-AzureRmResourceGroup -Name $myResourceGroup -Location $location

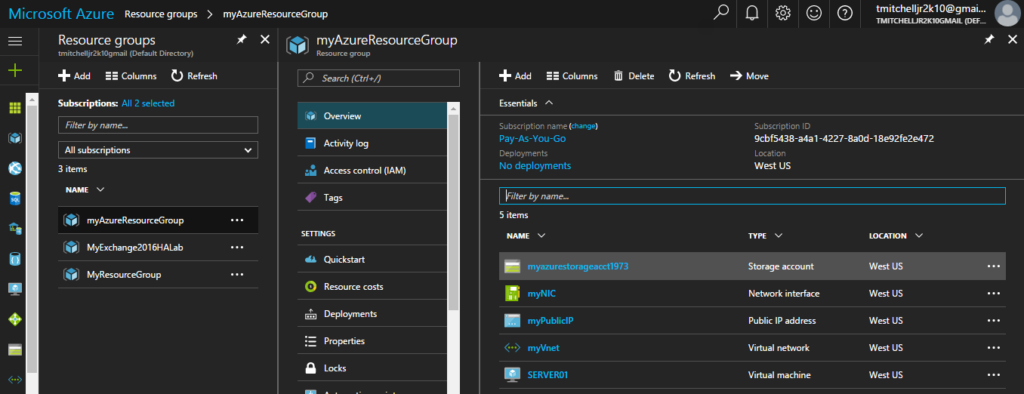
At this point, your Resource Group named myAzureResourceGroup has been provisioned in the West US location. With your resource group deployed, it’s time to create a storage account to hold your storage for your VM.
Create Storage Account
Before creating your storage account, you have to settle on a name that is unique across the entire Azure landscape. The name of your storage account must be between 3 and 24 characters and must consist only of lower case letters and numbers.
For this exercise, we will call the storage account myazurestorageacct1973.
To check the availability of the name, type the following two commands in PowerShell, hitting Enter after each one:
$myStorageAccountName = " myazurestorageacct1973"
Get-AzureRmStorageAccountNameAvailability $myStorageAccountName
If the second command returns True, the proposed name is unique within Azure and can be used.

To deploy the storage account, type the following command and hit Enter:
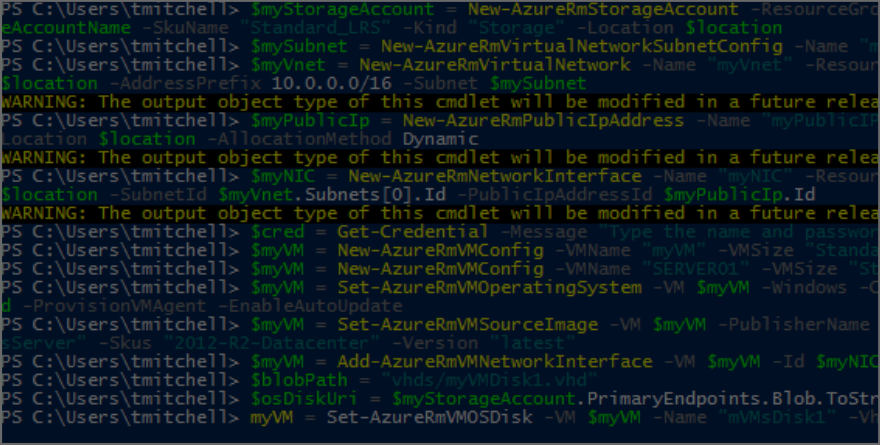
$myStorageAccount = New-AzureRmStorageAccount -ResourceGroupName $myResourceGroup -Name $myStorageAccountName -SkuName "Standard_LRS" -Kind "Storage" -Location $location
NOTE: The above command is one long line.
If everything goes as it should, you should just be taken back to the prompt in PowerShell:

Create a virtual network
Now that the resource group and storage account have been deployed, go ahead and create the virtual network that your eventual virtual machine will live on. To do this, you will have to deploy two resources: subnet and virtual network.
For this exercise, we will deploy a subnet called mySubnet with an address prefix of 10.0.0.0/24 on a 10.0.0.0/16 virtual network called myVnet.
Deploy the subnet first by running the following command in PowerShell and hitting Enter:
$mySubnet = New-AzureRmVirtualNetworkSubnetConfig -Name "mySubnet" -AddressPrefix 10.0.0.0/24
After running the command, you will be take back to the prompt.
With the subnet created, go ahead and deploy the virtual network by running the following command and hitting Enter:
$myVnet = New-AzureRmVirtualNetwork -Name "myVnet" -ResourceGroupName $myResourceGroup -Location $location -AddressPrefix 10.0.0.0/16 -Subnet $mySubnet
As was the case before, the above command is one long string. If run successfully, you will simply be taken back to the prompt in PowerShell.
By now, you’ve deployed your resource group, storage account, and virtual network with a subnet attached to it. It is now time to create a public IP address and network interface. The network interface will allow your virtual machine to connect to your virtual network while your public IP address will allow you to RDP into your virtual machine once it has been deployed.
Create a public IP address and network interface
Before provisioning your network interface, you will want to provision your public IP address. To do so, run the following command in PowerShell and hit Enter:
$myPublicIp = New-AzureRmPublicIpAddress -Name "myPublicIP" -ResourceGroupName $myResourceGroup -Location $location -AllocationMethod Dynamic
The command above is all one line and the result of it is a dynamic public IP address resource called myPublicIP. You will assign this public IP while provision your virtual network interface (named myNIC) by running the command below and hitting Enter:
$myNIC = New-AzureRmNetworkInterface -Name "myNIC" -ResourceGroupName $myResourceGroup -Location $location -SubnetId $myVnet.Subnets[0].Id -PublicIpAddressId $myPublicIp.Id
At this point, you’ve got the infrastructure prepared and you can now deploy the virtual machine.
Create a virtual machine
Virtual machines can be deployed using both sysprepped and non-sysprepped images. They can also be deployed from the Marketplace, which is what we are going to do here.
The first thing you’ll want to do is set the admin account and password for your virtual machine. To do this, run the command below and hit Enter:
$cred = Get-Credential -Message "Type the name and password of the local administrator account."
When prompted, supply an administrative username and password. The password must be at least 12 characters long and contain one upper case character, one lower case character, a number, and one special character.
Next, you’ll need to create a configuration object for the virtual machine. The configuration object includes a name for the virtual machine and a size for the virtual machine. For this exercise, we’ll name our virtual machine SERVER01 and use the “Standard_DS1_v2” size.
To complete this task, run the following command and hit Enter:
$myVM = New-AzureRmVMConfig -VMName "SERVER01" -VMSize "Standard_DS1_v2"
Click here for a list of supported server sizes in Azure.
Once you’ve completed the above task, you’ll need to configure the operating system for the virtual machine. This configuration task sets the computer name, OS type, and account credentials for the VM. To configure these settings run the following command from PowerShell:
$myVM = Set-AzureRmVMOperatingSystem -VM $myVM -Windows -ComputerName "SERVER01" -Credential $cred -ProvisionVMAgent –EnableAutoUpdate
Be sure to run the above command all on one line (no line breaks). As is the case with other commands, you’ll simply be returned to the prompt when it completes.
At this point, you can define the image you’d like to use to provision the virtual machine. Run the following command to deploy a Windows 2012 R2 Datacenter machine:
$myVM = Set-AzureRmVMSourceImage -VM $myVM -PublisherName "MicrosoftWindowsServer" -Offer "WindowsServer" -Skus "2012-R2-Datacenter" -Version "latest"
Now that the image is selected, go ahead and add the network interface that you provisioned earlier:
$myVM = Add-AzureRmVMNetworkInterface -VM $myVM -Id $myNIC.Id
Once you have the network interface added to your virtual machine, you can define the name and location of the hard disk for the VM. For this exercise, we will call our disk myVMDisk1.vhd.
To complete this task, run the following two commands, hitting Enter after each one:
$blobPath = "vhds/myVMDisk1.vhd"
$osDiskUri = $myStorageAccount.PrimaryEndpoints.Blob.ToString() + $blobPath
With the disk name and location defined, you can add the disk to your virtual machine configuration. The following command (all one line) will create a disk called myVMDisk1:
$myVM = Set-AzureRmVMOSDisk -VM $myVM -Name "mVMsDisk1" -VhdUri $osDiskUri -CreateOption fromImage
You can now create the actual virtual machine using the following command:
New-AzureRmVM -ResourceGroupName $myResourceGroup -Location $location -VM $myVM
To confirm creating of your new virtual machine, login to your Azure Portal and ensure it is listed under your resource group called myAzureResourceGroup.
You should also be able to connect to it via RDP.

My Active Directory Domain Controller in USN Rollback!
USN Rollback? WTF is That?
So, you rolled into work this morning, got your coffee, and settled in at your desk. It’s a nice Friday morning and the weekend is looking great. Life is good. You didn’t even have to do the domain controller patching last night. Your junior admin did.
Then…
You open your email… and you find a half-dozen tickets... and they all indicate several newly-provisioned users that were created earlier this morning can’t login. You think to yourself, “no biggie – I’ll just force replication and move on”. Easy-peasy, right?
Wrong.
After forcing AD replication among your Active Directory domain controllers – several times, you realize that the new accounts refuse to show up on any other DCs except for the one that your helpdesk typically connects to when provisioning users. So, you think to yourself, “Is this how my day is going to go?”
Yes. Yes it is.
You start troubleshooting by looking at the domain controller that the helpdesk uses and find that the Netlogon service is paused. Well, that’s weird. Being the highly-skilled troubleshooter you are, you opt to NOT try and restart Netlogon and, instead, track down the event logs for more information – only to find some event ID 2013’s, 8456’s, and 8457’s floating around. Not good.
After some further research, you suspect that your domain controller is in USN Rollback mode.
WTF is USN Rollback?
USN Rollback means that your day just got complicated.
Active Directory uses USN Rollback to protect against replicating stale info throughout AD by disabling replication to/from an affected DC. For example, if you take a snapshot of a domain controller VM, patch the VM, and then roll back to the snapshot because of issues with patching, the domain controller is likely to go into USN Rollback – especially if any AD replication occurred prior to rolling back to the snapshot.
Guess what your junior admin did last night…
Your Windows 2008 R2 domain controller is now refusing to replicate to or from any other domain controllers – and any changes that have been made on the affected DC are now stuck on that DC and will not be replicated to the rest of Active Directory. Running repadmin /replsummary shows that replication is failing to/from the affected domain controller. This all explains why the new users cannot login.
To confirm your suspicions, you open Regedit on the affected DC and browse to the following path:
HKLM\System\CurrentControlSet\Services\NTDS\Parameters
While in there, you see a key that says “DSA Not Writable” with a value of “4”. Now you know, for certain, that your Active Directory domain controller is definitely in USN Rollback. So, now what? Well, fix it! You have system state backups for the DC in question, don’t you? If so, it’s time to break them out so you can just do a non-authoritative restore on the DC and re-enable replication.
Although USN Rollback isn’t terribly difficult to recover from (if you are prepared), it DOES become a bit more of a headache if:
- You are doing what lots of companies do and multi-tasking your domain controllers
- You have no good system state backups
- You have no idea what the DSRM password is (has anyone EVER actually documented this??)
- You are dealing with any combination of A, B, and C
In your case, you realize that your affected domain controller also hosts your internal Certificate Authority. Peachy! Oh, you also have no idea what the DSRM password is for the affected DC. It was never documented. Yikes.
Without the DSRM password, a non-authoritative restore is out of the question. That would have been the easiest solution. As such, you are now left with only one choice – demote the affected domain controller and then re-promote it. Your problem, however, is that you cannot demote an Active Directory domain controller if Certificate Services is installed. You have to uninstall Certificate Services first. Ugh.
Although it sounds scary on the surface, uninstalling Certificate Services isn’t too terrible, provided you aren’t doing anything crazy. Microsoft has a great document here that covers the process of moving your CA to another server, which by the way, is what I recommend in this particular case. If you have to pull Certificate Services off of your domain controller anyway in order to demote/re-promote it, you might as well move the CA to it’s own server as a course of best practice.
After migrating your Certificate Authority to a new server, it’s time to get the DC fixed.
Since you are still using an older OS (Windows 2008 R2), go ahead and launch dcpromo /forceremoval from a command prompt. You are going to have to use the /forceremoval switch because the affected DC cannot replicate out. A regular dcpromo is not going to allow you to demote the domain controller gracefully.
During the forced demotion, you are going to see a few warnings that you have to agree to. The two you are most interested in are the DNS cleanup and whether or not this is the last DC in the forest. You DO want to remove the DNS zones from this DC. However, do NOT tell it that this is the last domain controller. Bad things will happen. Once the force demotion is complete, the server will reboot and no longer be part of the domain. Shut it down.
At this point, go into Active Directory Users and Computers on a healthy DC and delete the record for your demoted DC from the Domain Controllers container. In addition, go into AD Sites and Services, expand the demoted server, and delete the NTDS Settings object under it. Once you’ve done that, delete the server’s object from AD Sites and Services altogether. After performing these steps, your AD should be clean of any remaining metadata referencing the demoted domain controller.
Now that the metadata is cleaned up, you can go ahead and turn the demoted DC back on, re-join it to the domain, and re-promote it to a DC. Once you’ve done that, you can use repadmin /replsummary and repadmin /showreps to confirm replication to/from it is working again. You can also refresh AD Sites and Services to confirm that the Active Directory KCC is rebuilding replication links to/from the newly-promoted domain controller.
Once you’ve confirmed that replication is working again and that the DC is no longer in USN Rollback, you can go back to having a good day – after, of course, recreating the six user accounts that were created on the affected DC while it was in USN Rollback since those changes were lost when you performed the forced demotion.
Folks, there are a few key takeaways from this scenario:
- Stop sharing your DCs with other services
- VM Snapshots are bad news when it comes to DCs
- ALWAYS record the DSRM password when you promote a DC (even though nobody else does)
This Active Directory administrator’s life became significantly more difficult on a beautiful Friday morning because he failed to follow some simple best practices. Had he (or she) followed basic best practices, this entire exercise would have been reduced to a simple non-authoritative restore of the affected DC that would have required no more than an hour of time. Instead, the process required significantly more effort, lots of hand wringing, and a wasted Saturday.
This has been an Active Directory Public Service Announcement.
Deploying an Auto-Scaling VM Scale Set with a Custom Disk Image
Deploying a VM Scale Set via the Azure portal is straightforward when you are just using a clean, vanilla Windows OS image from the list that Azure provides you. However, what if a scale set that consists of a bunch of vanilla servers doesn’t help? What if I need to host a website on an infrastructure that scales up and down to meet demand?
I spent Sunday morning working on this exact problem.
If I need to deploy a group of IIS virtual machines that not only run the same web app but also scale up and down as demand changes, I am going to want to deploy an auto-scaling Virtual Machine Scale Set (VMSS) that is based on a custom disk image that contains my OS and fully configured web app. Otherwise, how are the additional instances that are automatically spun up going to run my web app?
The process was a bit more challenging than I expected. However, I was able to pull it off with some work.
To accomplish my goal, I had to complete the following tasks:
- Deploy a VM on Managed Disk
- Install IIS on my VM and Configure the Web App
- SysPrep the VM
- Shutdown and Stop the VM
- Capture the VM Disk Image
- Note the Location of the Image
- Build a Scale Set Template (actually borrowed one)
- Add Autoscale Settings to the Scale Set Template
- Ensure the Scale Set Template References the Captured Disk Image as the OS Disk
- Deploy the Scale Set Template
As you can see, there were actually quite a few steps involved to get this right. Unfortunately, it is what it is – you cannot use the Azure Portal alone to deploy an auto-scaling VM Scale Set that’s built on a custom disk image.
The Gold Image
Since I wanted all instances in my scale set to have the same identical configuration, including the web app settings and config, it only made sense that I would start by deploying a virtual machine in Azure, installing IIS on it, and then configuring my web app on it. With that in mind, I deployed a D1_v2 virtual machine with managed disk, installed IIS, and configured my web app.
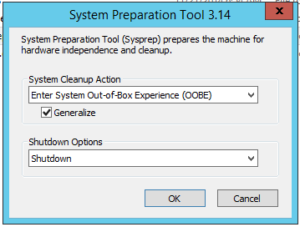 Once I confirmed that my web app was working, I ran SysPrep on the VM, chose OOBE with the “Generalize” option, and told SysPrep to shut the machine down when it was done.
After a few minutes, the machine was SysPrepped and shutdown so went into the Azure portal and stopped it to completely deallocate it.
I then needed to capture an image of my VM’s disk so I could use it as a reference for my scale set instances. To capture an image, I waited for my VM to be completely deallocated in my portal and then simply clicked the “Capture” button in Azure.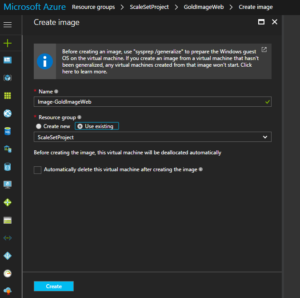
I waited for the capture to complete (about 3 minutes). My captured image would be the “Gold Image” that my scale set instances would use. Once the capture completed, I looked at the properties of the new disk image resource in my portal so I could note the location of the image.
The value under RESOURCE ID is the location of the image that I was interested in so I copied and pasted to a text file for future reference.
With the disk image location on hand; I was able to use an ARM template to deploy my scale set while specifying my custom disk image.
Creating the Scale Set Template
Although I was a coder at one time and know my way around ARM templates a bit, I will be the first to admit that I am not an ARM template expert. Lucky for me, there are scale set ARM templates published all over the internet. All I had to do was pull one down and modify it for my needs.
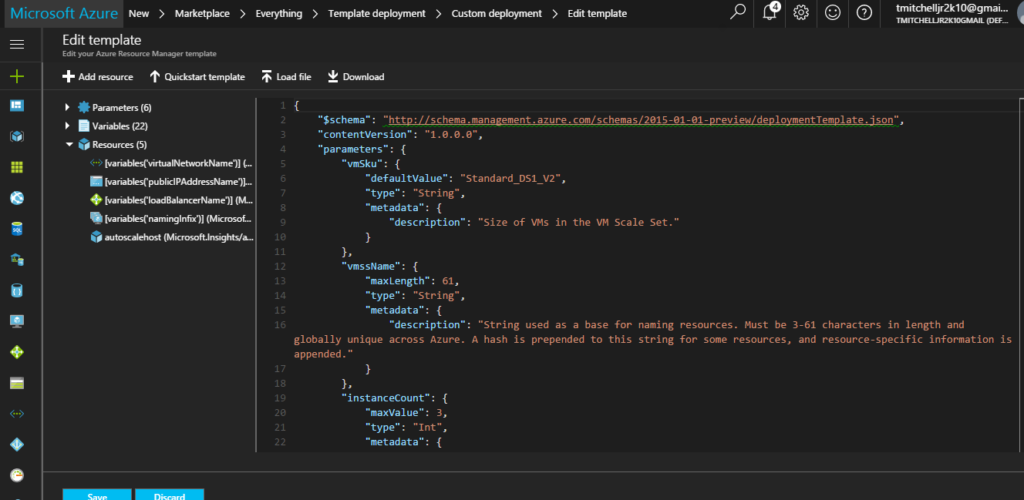
After pulling down this scale set ARM template, I went ahead and made a few minor modifications:
- Added custom disk reference (see orange code below)
- Added autoscale code (see red code below)
- Changed name reference (just some template cleanup)
- Changed instance values (see blue code below)
The complete template, including the autoscale settings is below:
 {
    "$schema": "http://schema.management.azure.com/schemas/2015-01-01-preview/deploymentTemplate.json",
    "contentVersion": "1.0.0.0",
    "parameters": {
        "vmSku": {
            "defaultValue": "Standard_DS1_V2",
            "type": "String",
            "metadata": {
                "description": "Size of VMs in the VM Scale Set."
            }
        },
        "vmssName": {
            "type": "string",
            "metadata": {
                "description": "Name of the VM scale set."
            }
      },
        "instanceCount": {
            "maxValue": 3,
            "type": "Int",
            "metadata": {
                "description": "Number of VM instances (100 or less)."
            }
        },
        "adminUsername": {
            "type": "String",
            "metadata": {
                "description": "Admin username on all VMs."
            }
        },
        "adminPassword": {
            "type": "SecureString",
            "metadata": {
                "description": "Admin password on all VMs."
            }
        },
        "osType": {
            "allowedValues": [
                "Windows",
                "Linux"
            ],
            "type": "String"
        }
    },
    "variables": {
        "namingInfix": "[toLower(substring(concat(parameters('vmssName'), uniqueString(resourceGroup().id)), 0, 9))]",
        "longNamingInfix": "[toLower(parameters('vmssName'))]",
        "vhdContainerName": "[concat(variables('namingInfix'), 'vhd')]",
        "addressPrefix": "10.0.0.0/16",
        "subnetPrefix": "10.0.0.0/24",
        "virtualNetworkName": "[concat(variables('namingInfix'), 'vnet')]",
        "publicIPAddressName": "[concat(variables('namingInfix'), 'pip')]",
        "subnetName": "[concat(variables('namingInfix'), 'subnet')]",
        "loadBalancerName": "[concat(variables('namingInfix'), 'lb')]",
        "publicIPAddressID": "[resourceId('Microsoft.Network/publicIPAddresses',variables('publicIPAddressName'))]",
        "lbID": "[resourceId('Microsoft.Network/loadBalancers',variables('loadBalancerName'))]",
        "natPoolName": "[concat(variables('namingInfix'), 'natpool')]",
        "bePoolName": "[concat(variables('namingInfix'), 'bepool')]",
        "natStartPort": 50000,
        "natEndPort": 50119,
        "natBackendPort": 22,
        "nicName": "[concat(variables('namingInfix'), 'nic')]",
        "ipConfigName": "[concat(variables('namingInfix'), 'ipconfig')]",
        "frontEndIPConfigID": "[concat(variables('lbID'),'/frontendIPConfigurations/loadBalancerFrontEnd')]",
        "computeApiVersion": "2016-04-30-preview",
        "networkApiVersion": "2016-03-30",
      "insightsApiVersion": "2015-04-01",
      "location": "[resourceGroup().location]"
    },
    "resources": [
        {
            "type": "Microsoft.Network/virtualNetworks",
            "name": "[variables('virtualNetworkName')]",
            "apiVersion": "[variables('networkApiVersion')]",
            "location": "[resourceGroup().location]",
            "properties": {
                "addressSpace": {
                    "addressPrefixes": [
                        "[variables('addressPrefix')]"
                    ]
                },
                "subnets": [
                    {
                        "name": "[variables('subnetName')]",
                        "properties": {
                            "addressPrefix": "[variables('subnetPrefix')]"
                        }
                    }
                ]
            }
        },
        {
            "type": "Microsoft.Network/publicIPAddresses",
            "name": "[variables('publicIPAddressName')]",
            "apiVersion": "[variables('networkApiVersion')]",
            "location": "[resourceGroup().location]",
            "properties": {
                "publicIPAllocationMethod": "Dynamic",
                "dnsSettings": {
                    "domainNameLabel": "[variables('longNamingInfix')]"
                }
            }
        },
        {
            "type": "Microsoft.Network/loadBalancers",
            "name": "[variables('loadBalancerName')]",
            "apiVersion": "[variables('networkApiVersion')]",
            "location": "[resourceGroup().location]",
            "properties": {
                "frontendIPConfigurations": [
                    {
                        "name": "LoadBalancerFrontEnd",
                        "properties": {
                            "publicIPAddress": {
                                "id": "[variables('publicIPAddressID')]"
                            }
                        }
                    }
                ],
                "backendAddressPools": [
                    {
                        "name": "[variables('bePoolName')]"
                    }
                ],
                "inboundNatPools": [
                    {
                        "name": "[variables('natPoolName')]",
                        "properties": {
                            "frontendIPConfiguration": {
                                "id": "[variables('frontEndIPConfigID')]"
                            },
                            "protocol": "tcp",
                            "frontendPortRangeStart": "[variables('natStartPort')]",
                            "frontendPortRangeEnd": "[variables('natEndPort')]",
                            "backendPort": "[variables('natBackendPort')]"
                        }
                    }
                ]
            },
            "dependsOn": [
                "[concat('Microsoft.Network/publicIPAddresses/', variables('publicIPAddressName'))]"
            ]
        },
        {
            "type": "Microsoft.Compute/virtualMachineScaleSets",
            "sku": {
                "name": "[parameters('vmSku')]",
                "tier": "Standard",
                "capacity": "[parameters('instanceCount')]"
            },
            "name": "[parameters('vmssName')]",
            "apiVersion": "[variables('computeApiVersion')]",
            "location": "[resourceGroup().location]",
            "properties": {
                "overprovision": "true",
                "upgradePolicy": {
                    "mode": "Manual"
                },
                "virtualMachineProfile": {
                    "storageProfile": {
                        "imageReference": {
                            "id": "/subscriptions/9cbf5438-a4a1-4227-8a0d-18e92fe2e472/resourceGroups/vmssdemo/providers/Microsoft.Compute/images/GoldImage"
                        }
                    },
                    "osProfile": {
                        "computerNamePrefix": "[variables('namingInfix')]",
                        "adminUsername": "[parameters('adminUsername')]",
                        "adminPassword": "[parameters('adminPassword')]"
                    },
                    "networkProfile": {
                        "networkInterfaceConfigurations": [
                            {
                                "name": "[variables('nicName')]",
                                "properties": {
                                    "primary": "true",
                                    "ipConfigurations": [
                                        {
                                            "name": "[variables('ipConfigName')]",
                                            "properties": {
                                                "subnet": {
                                                    "id": "[concat('/subscriptions/', subscription().subscriptionId,'/resourceGroups/', resourceGroup().name, '/providers/Microsoft.Network/virtualNetworks/', variables('virtualNetworkName'), '/subnets/', variables('subnetName'))]"
                                                },
                                                "loadBalancerBackendAddressPools": [
                                                    {
                                                        "id": "[concat('/subscriptions/', subscription().subscriptionId,'/resourceGroups/', resourceGroup().name, '/providers/Microsoft.Network/loadBalancers/', variables('loadBalancerName'), '/backendAddressPools/', variables('bePoolName'))]"
                                                    }
                                                ],
                                                "loadBalancerInboundNatPools": [
                                                    {
                                                        "id": "[concat('/subscriptions/', subscription().subscriptionId,'/resourceGroups/', resourceGroup().name, '/providers/Microsoft.Network/loadBalancers/', variables('loadBalancerName'), '/inboundNatPools/', variables('natPoolName'))]"
                                                    }
                                                ]
                                            }
                                        }
                                    ]
                                }
                            }
                        ]
                    }
                }
            },
            "dependsOn": [
                "[concat('Microsoft.Network/loadBalancers/', variables('loadBalancerName'))]",
                "[concat('Microsoft.Network/virtualNetworks/', variables('virtualNetworkName'))]"
            ]
        },
{
  "type": "Microsoft.Insights/autoscaleSettings",
      "apiVersion": "[variables('insightsApiVersion')]",
      "name": "autoscalehosts",
      "location": "[variables('location')]",
      "dependsOn": [
        "[concat('Microsoft.Compute/virtualMachineScaleSets/', parameters('vmssName'))]"
      ],
  "properties": {
    "enabled": true,
    "name": "autoscalehosts",
    "profiles": [
      {
        "name": "Profile1",
        "capacity": {
          "minimum": "1",
          "maximum": "3",
          "default": "1"
        },
        "rules": [
          {
            "metricTrigger": {
              "metricName": "Percentage CPU",
                  "metricNamespace": "",
                  "metricResourceUri": "[concat('/subscriptions/',subscription().subscriptionId, '/resourceGroups/',  resourceGroup().name, '/providers/Microsoft.Compute/virtualMachineScaleSets/', parameters('vmSSName'))]",
                  "timeGrain": "PT1M",
                  "statistic": "Average",
                  "timeWindow": "PT5M",
                  "timeAggregation": "Average",
                  "operator": "GreaterThan",
                  "threshold": 60.0
            },
            "scaleAction": {
              "direction": "Increase",
                  "type": "ChangeCount",
                  "value": "1",
                  "cooldown": "PT1M"
            }
          },
          {
            "metricTrigger": {
               "metricName": "Percentage CPU",
                  "metricNamespace": "",
                  "metricResourceUri": "[concat('/subscriptions/',subscription().subscriptionId, '/resourceGroups/',  resourceGroup().name, '/providers/Microsoft.Compute/virtualMachineScaleSets/', parameters('vmSSName'))]",
                  "timeGrain": "PT1M",
                  "statistic": "Average",
                  "timeWindow": "PT5M",
                  "timeAggregation": "Average",
                  "operator": "LessThan",
                  "threshold": 30.0
            },
            "scaleAction": {
              "direction": "Decrease",
                  "type": "ChangeCount",
                  "value": "1",
                  "cooldown": "PT1M"
            }
          }
        ]
      }
    ],
    "targetResourceUri": "[concat('/subscriptions/', subscription().subscriptionId, '/resourceGroups/', resourceGroup().name, '/providers/Microsoft.Compute/virtualMachineScaleSets/', parameters('vmSSName'))]"
  }
}
    ]
}
An in-depth explanation of the architecture of this template file will require an entire post all by itself so I am not going to break down the template here. That said, keep an eye out for a future post, where I will break everything down.
What Does the Template Do?
In its current state, the template (as written) limits the initial scale set deployment to a maximum of 3 instances. It also deploys the required load balancer for the scale set, along with the network and subnet values specified in the template (10.0.0.0/16 and 10.0.0.0/24).
The template configures the scale set to autoscale based on CPU utilization. At 60% utilization over 5 minutes, it will scale up by one instance. At 30% utilization, it will scale down by one instance.
Deploying the Template
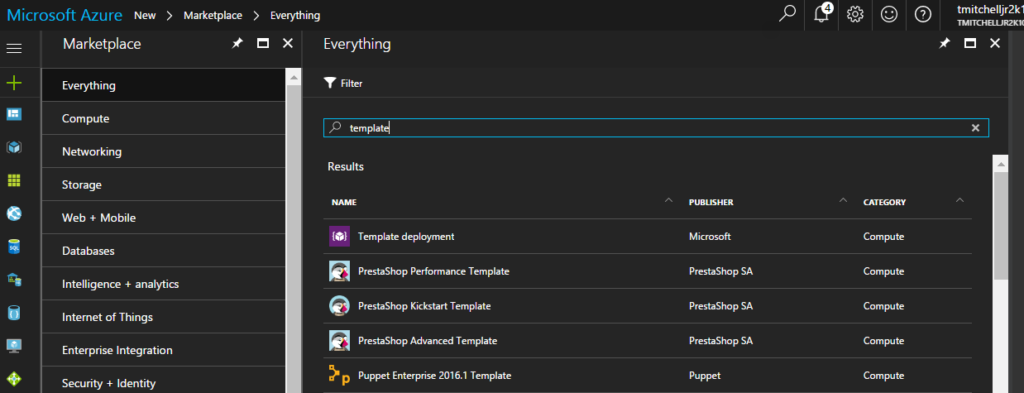
Deploying the scale set using the template isn’t terribly difficult. To deploy it, browse the marketplace in the portal and search for “template deployment” and click on it in the list.
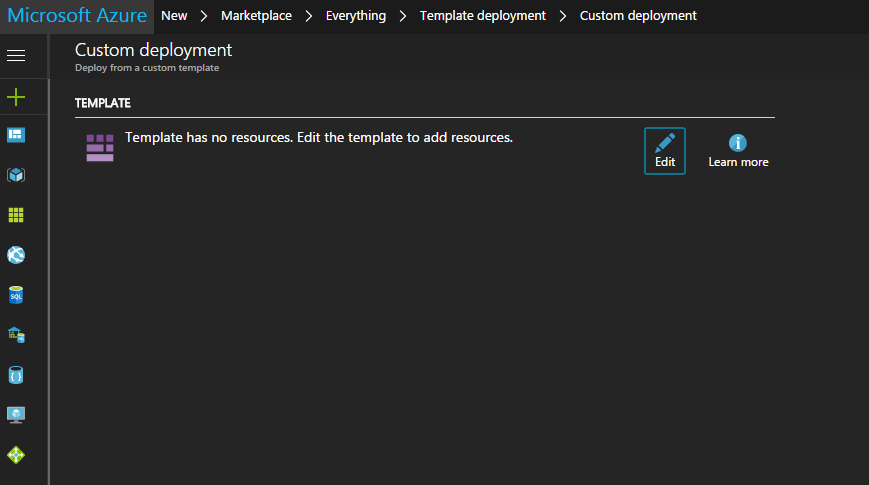
After clicking on the “Template Deployment” resource, click the blue “Create” button. You’ll then be offered the opportunity to upload the template.
Click the “Edit” button, then “Load File”, and then browse to your saved template file. The screen will change, displaying the content of your template:
With your template loaded, click “Save”.
You will be prompted for information about your scale set. Provide the following information:
- Resource Group (I usually create a new one so everything is in one place)
- VMSS Name (name of your scale set)
- Instance Count (number of instances to deploy)
- Admin Username (admin username for all instances)
- Admin Password (admin password for all instances)
- OS Type (what type of OS you are deploying)
After supplying the information for your new scale set, check the box to agree to terms and conditions and then click “Purchase”. The template is validated and the deployment begins.
Deployment takes maybe 10-15 minutes or so.
When complete, you will have an auto-scaling VM Scale Set that is based on a managed custom disk image. All instances that are spun up will contain your applications and your OS just as they were configured on your “Gold Image”.
Your Turn…
So, now it’s your turn. If you want to deploy a scale set based on a custom disk image, you will want to deploy a virtual machine through the portal before you do anything else. I typically use the D1_V2 size. Once you have the virtual machine deployed and OS configured, install and configure your applications on the server. You will obviously have to RDP into it to do this.
After ensuring your applications work correctly, perform a SysPrep on the server by browsing to Windows\System32\Sysprep and running the sysprep.exe app. When running SysPrep, you should choose the OOBE option, ensure the “Generalize” box is checked, and select the option to shut down after SysPrep is done. When SysPrep is complete, the virtual machine will shut down. Before going onto the next step, go into your Azure portal and “Stop” the virtual machine from the Overview blade of your VM.
With the virtual machine stopped, click the “Capture” icon. After a few minutes, you will have a “disk image” resource in your resource group in Azure. To get the location of the image, click on the image resource and note the value in the RESOURCE ID value.
After noting the disk image location, copy the template code from earlier in this article and save it as “template.json”. Make sure you do not save it as a text file.
Once you have the file saved, go to the orange code in the file and replace it with the value from your RESOURCE ID box. With the disk image location modified, there are no other required changes to the template file. You can save your file and deploy it. Go back to the Deploying the Template section of this article for the steps involved in deployment.
How Do I Know It Worked?
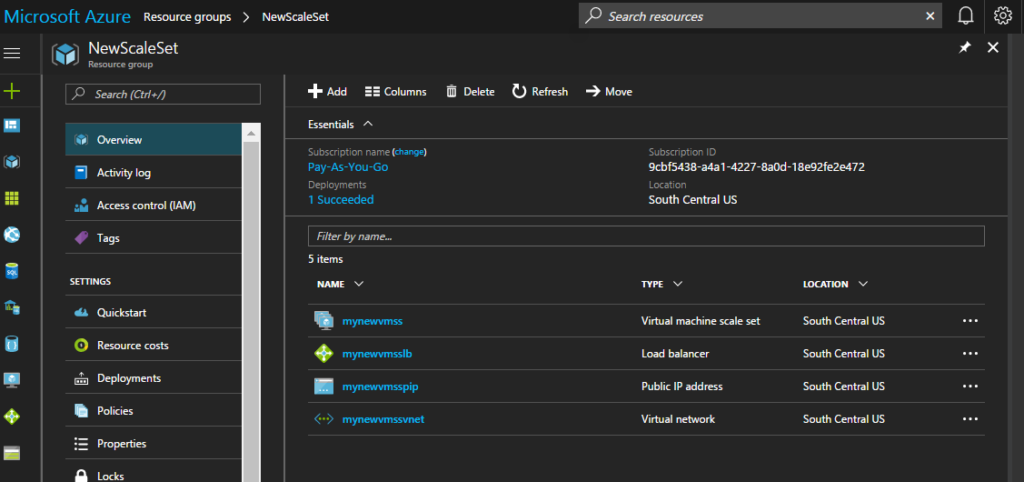
Browse to your Resource Group in your portal and click “Overview”. You should see the following resources running in the right pane:
- Virtual Machine Scale Set
- Load Balancer
- Public IP Address
- Virtual Network
The names of your resources will be based on what name you gave your Scale Set when you deployed it.
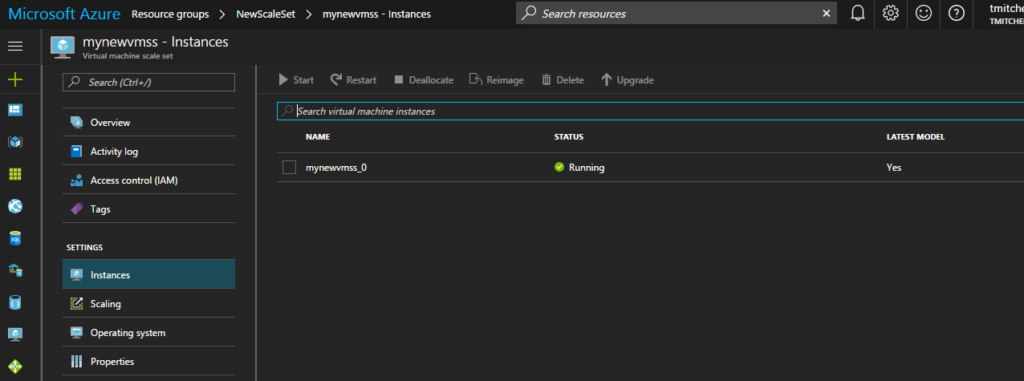
If you click on the scale set, and then “Instances” under “Settings”, you will see how many instances are running.
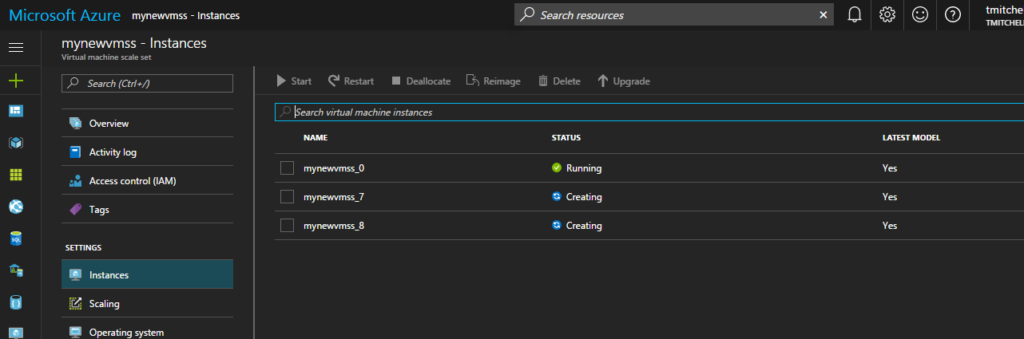
A cool test to run is to download LoadSim to your instance and jack up the CPU cycles. As the CPU utilization rises, you will see Azure automatically deploy additional instances as part of the scale set. You can download the LoadSim here.
But How to I Connect?
Did you notice that there is no “Connect” option that allows you to RDP into your instances? That is “as-designed” in order to reduce costs and complexity of the need for a public IP for every instance that is spun up. However, what you CAN do is spin up a “jump box” (another VM in Azure) and RDP to your instances from it.
The IP addresses for your instances can be found by clicking on the Load Balancer resource and then “Backend Pools”. Azure will display the instances on the backend, along with their private IP addresses.

Simply RDP to the IP address of the instance and install the load simulator. Mess around with the settings and watch as the scale set adds and removes instances based on load.
Wrap Up
If you ask me, the process of creating a scale set based on a custom image is a bit more tedious than it really needs to be. I suspect that, at some point, the functionality will be added to the portal. However, until then, we are left with PowerShell and ARM Templates as our options.
With that said, it never hurts to know your way around PowerShell and templates anyway so get to it. Go deploy your own autoscaling VM scale set using a template and add another skillset to your Azure arsenal!

How to Extend On-Premises Active Directory to Microsoft Azure
I am seeing an uptick in the number folks asking me about extending local on-premises Active Directory into Azure. As such, I figured I should put together an article that explains the proper way to extend an on-prem Active Directory into Azure.
An Overview
To be honest, getting local AD extended to the cloud is not terribly difficult. However, there IS a special order in which things need to happen in order to make it work properly. The first order of business is the deployment of a virtual network in Azure. Once the virtual network is deployed in Azure and secured with a Network Security Group, a VPN connection needs to be made between the on-prem network and the Azure virtual network. With the VPN connectivity in place, the DNS configuration of the virtual network needs to be configured to point back to the on-prem DNS servers (since they know how to resolve the local Active Directory domain).
After the configuration of the virtual network and VPN in Azure are complete, a virtual machine needs to be provisioned in Azure. Because the virtual network points to the on-prem DNS, the virtual machine will inherit those DNS servers when it comes up. The virtual machine should be deployed with no public IP address and it should have a separate 20-40GB data drive with caching turned off. This is a Microsoft-supported configuration and prevents USN Rollbacks.
Once the virtual machine is provisioned, it should be joined to the on-prem Active Directory just like any other member server. After making the virtual machine a member server, Active Directory Domain Services should be installed. The server can then be promoted to a domain controller for the on-prem AD. Active Directory should be stored on the data disk that was provisioned, not the system drive.
At this point, Active Directory Sites and Services should be configured to reflect the new Azure network as a new site. Once this configuration is complete, the on-prem Active Directory is successfully extended to Azure.
Extending On-Prem Active Directory to Azure: Step By Step
Now that you have a high-level view of what has to happen to allow for a successfully extension of on-prem Active Directory to Azure, let’s walk through the individual steps that are required.
Deploy and Secure the Azure Virtual Network
Go into your ARM portal and deploy a virtual network with an address space that does not overlap your on-premises network space. For example, you might deploy an address space of 10.0.0.0/16 in Azure if your on-prem address space is 192.168.0.0/16. While deploying the virtual network in Azure, you will be prompted for a default subnet and address range for it. Do not use the entire address space when creating your subnet. Only use what you need. In this example, you might use 10.0.1.0/24 as your subnet range. Once the virtual network is deployed, be sure to deploy a Network Security Group in Azure that contains an inbound rule that allows RDP traffic only from your network.
Establish VPN Connectivity
Depending on your on-prem VPN device, you might need to deploy a route-based VPN or a policy-based VPN in Azure. If your on-prem VPN device supports IKE2, you will want to deploy a route-based VPN. Otherwise, deploy a policy-based VPN. Most devices that I have encountered to date only support IKE1.
Deploying an Azure VPN requires a few different pieces. It requires a Gateway Subnet on the Azure virtual network, a Virtual Network Gateway with a public IP address, a Local Gateway that represents the on-prem network device, and a Connection.
Start your VPN deployment by provisioning a Gateway Subnet on your virtual network. A Gateway Subnet should consist of a /27 range. To make things easy for yourself, click here to download the Gateway Subnet Calculator. The Gateway Subnet Calculator is a PowerShell script that takes your virtual network address space and uses it to automatically calculate an address range for your Gateway Subnet. It is a pretty handy tool. Just follow the instructions that come with it. If you stick with the examples from earlier in this article, the calculator will produce a Gateway Subnet range of xxx.xxx.xxx.xxx.
Once you have the Gateway Subnet configured, go ahead and deploy a Virtual Network Gateway and specify your Gateway Subnet during deployment. During configuration, specify the address space of your Azure virtual network in the "address spaces" section so your domain controller is accessible over the VPN when it is complete.
The deployment of the Virtual Network Gateway will often take up to 45 minutes to complete once it has been submitted so go find something productive to do while that is happening. Eventually the Virtual Network Gateway deployment will complete and it will show a public IP address. Jot it down because you will need it to provision the VPN shortly.
With the Virtual Network Gateway provisioned, go ahead and provision a Local Network Gateway. Specify the public IP address of your on-prem VPN device when configuring the gateway. Additionally, add any additional underlying address spaces in the "address spaces" section. These address spaces reflect networks that you wish to access over the VPN. Talk to your network admin if you are not sure of what address spaces are in use in your environment.
At this point, you should have your Virtual Network Gateway configured, along with your Local Network Gateway. With both gateways configured, you can deploy the actual connection by clicking the "+" sign in your ARM dashboard and searching for "Connection". You will be prompted for a Virtual Gateway, a Local Gateway, and a shared key. Select the gateways you have provisioned and enter a shared key (your network admin will need to use the same key). Once you do this, the configuration on the Azure side is complete. Go ahead and provide the public IP of your Virtual Network Gateway to your network administrator so he can configure the VPN on his side of the house (the local VPN device). He/she will also need the address space of your virtual network and the shared key you chose so provide that info as well.
Once the local VPN device is configured, the status of the VPN in Azure should switch to Succeeded/Connected.
Deploy the Virtual Machine
Now that the connectivity between Azure and your on-prem network is up and running, you can go ahead and deploy the virtual machine that will eventually become your domain controller in Azure. Unless you are upgrading your AD at the same time (not recommended), be sure that the OS you choose matches your current domain controllers. When deploying the VM, go with a reasonable size. I have found Standard A2_V2 size to be sufficient in most cases for small environments.
While deploying the virtual machine, you will be prompted to assign a public IP. You can go ahead and assign it a public IP for now, but you will eventually need to remove it since you don't want a DC to be accessible publicly. However, assuming your VPN connectivity is good, you should really just forego the assignment of a public IP and configure the VM via RDP from your local network over the VPN using its internal IP address instead. Additionally, choose the option to deploy an Availability Set as well. Doing so will allow you to later add a second domain controller into the set to ensure at least one of the DCs in Azure is always available. Change the assigned internal IP address from dynamic to static. After deploying the virtual machine, provision and attach a data disk and set the Host Cache Preference to None. This data disk will house Active Directory.
Configure the Virtual Machine
Once the new virtual machine comes up, RDP to it and configure it as you normally would. Apply any needed patches, set the time zone, etc. If necessary, go into disk manager on the virtual machine, scan for the data disk that you provisioned earlier, and make sure it is formatted and a volume exists on it.
After configuring the server, reboot if necessary and then join it to the on-prem Active Directory just as you would any other server. You can then go ahead and install Active Directory Domain Services and promote it to a Domain Controller. Make sure you've removed the public IP first. Be sure to specify the data disk that you provisioned as the path for Active Directory. The installation process is going to complain about your VM having a NIC with a DHCP-assigned address. You can ignore this. Yes, your OS sees a DHCP configuration; however, the IP is never going to change because it was set to static in Azure.
Wrapping Up
At this point, you can go back into your ARM portal and reconfigure your virtual network DNS so that it points to the IP address of your newly promoted Azure-based domain controller and reboot the VM so it picks up this new setting. You should also remove the public IP address from the VM in the portal as well if you haven't done so already. Once you do this, you will have to RDP to the VM using its internal IP address from your on-prem network. Test and make sure the server is accessible after removing the public IP. If all is still good, finish up by adding a site to Active Directory Sites and Services that reflects the new Azure subnet.
Congratulations, you just extended your on-prem Active Directory into Azure.